
Theory
Introduction to Arduino UNO
The Arduino Uno is a versatile and popular microcontroller board renowned for its open-source nature and user-friendly design.At its core, this compact yet powerful board serves as a gateway to a realm of endless possibilities in electronics and programming. With its user-friendly interface and rich array of features, the Arduino Uno empowers both novices and experts alike to bring their ideas to life, whether it's crafting interactive art installations, building smart home devices, prototyping IoT solutions, or experimenting with robotics. Following are the features and functionalities of the Arduino Uno:
.png)
Microcontroller:
The Microchip ATmega328P microcontroller serves as the central processing unit or "brain" of the Arduino Uno board. It is responsible for executing the user-defined instructions programmed into the board and overseeing a multitude of input/output operations. As the core component, the ATmega328P microcontroller manages tasks such as reading sensor data, controlling motors and actuators, communicating with other devices, and processing user inputs. Its versatility and efficiency make it well-suited for a wide range of applications, from simple DIY projects to complex electronic systems. With its processing power and capabilities, the ATmega328P enables the Arduino Uno to function as a versatile and user-friendly platform for hobbyists, educators, and professionals alike, empowering them to bring their ideas to life through interactive and programmable electronics.
Digital and Analog I/O Pins:
The Arduino Uno's hardware configuration is designed to provide users with a robust set of digital and analog input/output (I/O) capabilities, facilitating a wide range of project possibilities. Firstly, the board offers 14 digital I/O pins, allowing users to connect and control various digital devices such as switches, buttons, and digital sensors. These pins can be configured to either read digital signals as inputs or output digital signals to control external components. This flexibility enables users to interface with a diverse array of digital peripherals, expanding the functionality of their projects. Furthermore, six of these digital pins are equipped with Pulse Width Modulation (PWM) capabilities. PWM allows for the precise control of analog-like devices, such as motors and LEDs. This feature is particularly useful for applications requiring smooth and accurate control of these devices. In addition to digital I/O, the Arduino Uno provides six analog input pins. These pins allow the board to read analog signals from sensors, potentiometers, and other analog devices. By converting analog signals into digital values using an analog-to-digital converter (ADC), the Arduino Uno can measure physical quantities such as temperature, light intensity, and pressure with precision. This capability is essential for projects that require monitoring and responding to real-world analog data.
Programmability:
The Arduino Uno, a popular microcontroller board, is easily programmed through the Arduino Integrated Development Environment (IDE). This software provides a simple yet robust platform for writing, compiling, and uploading code to the microcontroller. The IDE offers a user-friendly interface, designed to be approachable for beginners while still catering to the needs of advanced users. It abstracts many of the complexities of embedded systems programming, allowing users to focus more on their projects rather than getting bogged down in technical details. One of the key advantages of the Arduino IDE is its use of a simplified version of the C++ programming language. While C++ itself can be quite complex, the Arduino variant streamlines the syntax and offers a set of libraries tailored specifically for interacting with the microcontroller's hardware. This makes it easier for newcomers to grasp the fundamentals of programming while still providing enough flexibility and power for more experienced developers to create sophisticated projects.

Versatile Applications:
The Arduino Uno's versatility stems from its capability to interface with both analog and digital signals, enabling a multitude of applications across various domains. Firstly, its ability to read analog signals makes it suitable for applications requiring precise measurement and control. For instance, it can interface with sensors such as temperature sensors, light sensors, or potentiometers, allowing users to gather real-world data and respond accordingly. This functionality is crucial in environmental monitoring systems, home automation projects, and industrial automation applications. Furthermore, the Arduino Uno can effortlessly control various output devices, including motors, LEDs, displays, and actuators. By manipulating digital signals, it can drive motors to perform specific tasks, toggle LEDs on and off to indicate status or trigger actions, and control actuators to move mechanical components. This makes it invaluable in robotics, home automation, and interactive art installations, among other areas. Moreover, the Arduino Uno's communication capabilities extend its utility even further.
Standard Form Factor:
The Arduino Uno's adherence to a standard form factor is a key feature that enhances its versatility and usability. This standardization allows the Arduino Uno to seamlessly integrate with a vast ecosystem of expansion boards, commonly referred to as shields. Shields are accessory boards specifically designed to be compatible with the Arduino Uno's form factor. They can extend the functionality of the Arduino Uno by adding various features and capabilities, such as wireless connectivity (e.g., Wi-Fi, Bluetooth), GPS, additional input/output ports, sensors, motor controllers, display screens, and more. These shields essentially provide plug-and-play functionality, enabling users to easily augment the capabilities of their Arduino Uno without the need for complex wiring or soldering.
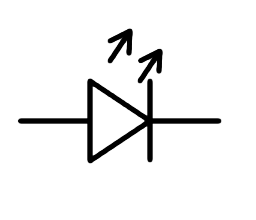
Light Emitting Diode(LED)
What is a LED?
A Light-Emitting Diode (LED) is a semiconductor device that emits light when an electric current passes through it. LEDs are constructed from semiconductor materials such as gallium arsenide, gallium nitride, or indium phosphide. When electrons combine with electron holes within the semiconductor material, they release energy in the form of photons, resulting in the emission of light. LEDs are commonly used as indicators, in lighting fixtures, displays, and various other applications due to their energy efficiency, durability, and versatility in producing different colors of light.
Principle of Operation of LED:
LEDs, or Light Emitting Diodes, function based on a fascinating phenomenon called electroluminescence. Within an LED, there's a semiconductor material that allows the flow of electric current. When current flows through this semiconductor, something remarkable happens. The semiconductor consists of two types of charged particles: electrons, which carry a negative charge, and electron holes, which are essentially vacancies where an electron could be. When an electric current passes through the semiconductor, the electrons and electron holes combine. Now, this joining of electrons and electron holes isn't just a simple union. It's an event that releases energy in the form of light particles, or photons. This process is what generates the light that we see emanating from the LED. What's particularly fascinating is that LEDs are highly efficient in converting electrical energy into light. Unlike traditional incandescent bulbs, which waste a lot of energy as heat, LEDs predominantly convert electricity directly into light. This efficiency makes LEDs not only environmentally friendly but also economically advantageous due to their lower energy consumption and longer lifespan.
Composition and Structure of LED:
LEDs, or Light Emitting Diodes, are composed of semiconductor materials meticulously engineered for their light-emitting properties. Common semiconductor materials used in LED fabrication include gallium arsenide (GaAs), gallium nitride (GaN), and indium phosphide (InP). The key to LED operation lies in the semiconductor's unique electronic structure, particularly its band gap. The band gap is the energy difference between the valence band and the conduction band in the semiconductor material. When electrons in the valence band absorb energy, they can jump to the conduction band, leaving behind electron holes in the valence band. The energy released when electrons recombine with these holes can manifest as light.
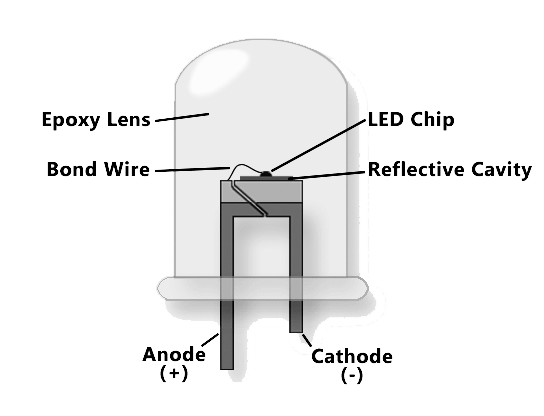
Each semiconductor material has a specific band gap, which determines the energy of the photons emitted and, consequently, the color of light produced by the LED. For instance, materials with larger band gaps emit higher energy photons, typically in the blue to ultraviolet range, while materials with smaller band gaps emit lower energy photons, often in the red to infrared range. In constructing an LED, the semiconductor material is sandwiched between two electrodes—an anode and a cathode. When a voltage is applied across the LED, electrons are injected into the semiconductor material from the negative (cathode) electrode and holes from the positive (anode) electrode. This process is known as forward biasing and creates an excess of electrons and holes in the semiconductor, facilitating recombination and the emission of light. The structure of the LED is designed to ensure that current flows predominantly in one direction, from the anode to the cathode, to maintain efficient operation. This uni-directional current flow prevents the LED from being damaged by reverse voltage and ensures consistent and reliable emission of light.
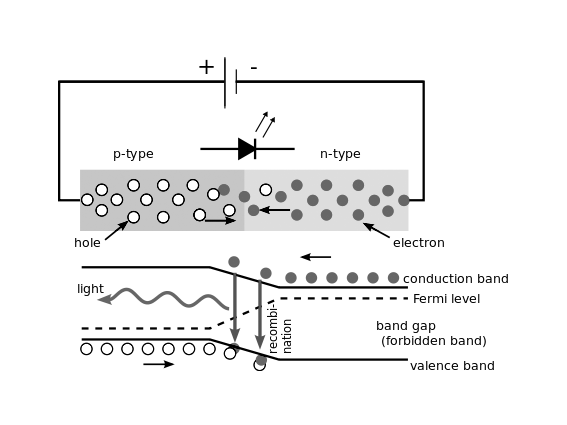
Working of LED:
When a diode is forward biased, meaning a positive voltage is applied to the p-type material and a negative voltage to the n-type material, minority carriers—electrons in the p-type material and holes in the n-type material—are pushed towards the junction between the two materials. This movement increases the concentration of minority carriers near the junction. At the junction, minority electrons from the p-type material combine with minority holes from the n-type material through a process called recombination. In standard diodes, this recombination typically releases energy in the form of heat. However, in light-emitting diodes (LEDs), the recombination of minority carriers results in the release of energy in the form of photons, which is light. This phenomenon, known as electroluminescence, is what enables LEDs to emit light when an electric current passes through them. The energy released by the recombination of electrons and holes is proportional to the energy of the photons emitted, determining the color and intensity of the light produced. As the forward voltage across the LED increases, the rate of recombination also increases, leading to a higher intensity of emitted light. However, there is a limit to this intensity, as excessive current can cause the LED to overheat and potentially damage it. Therefore, LEDs are typically operated within a specified range of forward voltages to ensure optimal performance and longevity.
Color Varieties LED offers:
LEDs possess a remarkable ability to emit light across a broad spectrum of colors, a feature that stems from the careful engineering of the semiconductor materials they are composed of. The color emitted by an LED is fundamentally determined by the energy band gap of the semiconductor material. Each semiconductor material has a specific band gap, which dictates the energy of the photons emitted when electrons recombine with electron holes within the material. For instance, materials with larger band gaps emit higher energy photons, which correspond to shorter wavelengths of light, such as blue or ultraviolet. Conversely, materials with smaller band gaps emit lower energy photons, resulting in longer wavelengths of light, such as red or infrared. Manufacturers can harness this principle by precisely controlling the composition and structure of the semiconductor material to produce LEDs that emit light of specific colors. For example, LEDs made from gallium nitride (GaN) emit blue light, while those made from gallium arsenide phosphide (GaAsP) emit red light. By combining different semiconductor materials or adding impurities to alter the band gap, manufacturers can create LEDs that emit green, blue, yellow, or even white light.
Energy Efficiency of LED:
LEDs (Light-Emitting Diodes) are renowned for their remarkable energy efficiency compared to traditional lighting technologies. They consume significantly less electrical power while producing the same amount of light (lumens), resulting in substantial energy savings. This efficiency stems from their high luminous efficacy, as LEDs can convert a greater percentage of electrical energy into visible light, minimizing wasted energy. Their directional light output further enhances efficiency by reducing light wastage and eliminating the need for additional reflectors or diffusers. Additionally, LEDs achieve full brightness almost instantly upon activation, eliminating the need for prolonged warm-up times and reducing unnecessary energy consumption. With their long lifespan and minimal heat emission, LEDs also contribute to energy savings by reducing the frequency of replacements and minimizing the load on cooling systems.
Push Button:
A push button, also known simply as a button, is a common switch mechanism used to control various aspects of machines or processes. These buttons are typically made of hard materials like plastic or metal and are designed to be easily pressed or pushed by a human finger or hand.
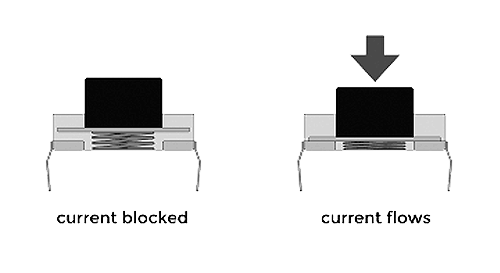
The structure of a push button typically consists of a button cap, which is the visible part of the button that is pressed, and an underlying switch mechanism. The button cap can have various shapes and designs, depending on its intended use and user interface requirements. It may be flat, domed, or concave to accommodate different types of presses. The switch mechanism inside the push button is responsible for making or breaking electrical connections when the button is pressed or released. Push buttons can be categorized into biased or unbiased switches. Biased buttons have a built-in spring mechanism that returns the button to its original position after it's released. Unbiased buttons, on the other hand, rely on their physical nature to return to their unpressed state.
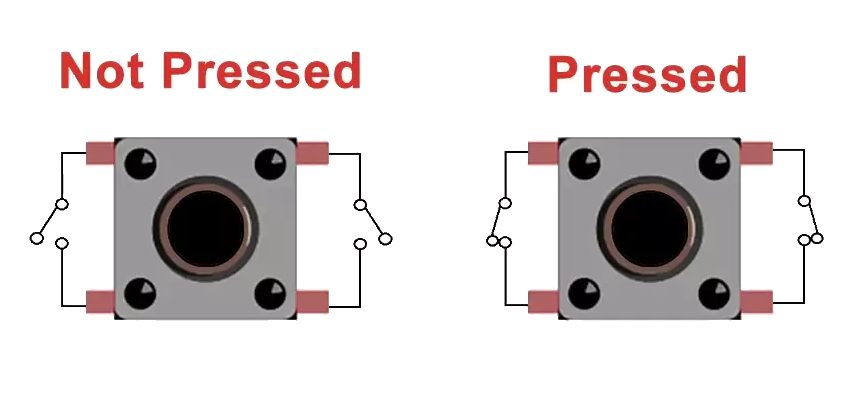
When a push button is pressed, it actuates the switch mechanism, completing an electrical circuit or triggering a specific action depending on its configuration. This action could be turning a device on or off, initiating a process, or signaling a response in a control system. Push buttons are widely used in various applications, including consumer electronics, industrial machinery, automotive controls, and user interfaces. They provide a simple and intuitive way for users to interact with devices and systems, making them indispensable components in many electronic and mechanical designs.
Types of Push Buttons:
Various types of push-buttons cater to specific needs. From momentary switches for temporary activation to latching buttons for toggling states, these components are designed to meet diverse requirements in electronics, machinery, and beyond. Following are some of the push buttons:
Momentary Buttons:
Momentary push-buttons, the ubiquitous components found in numerous electronic devices, serve a pivotal role in facilitating temporary activation. Engineered with a spring mechanism, these switches establish or disrupt circuits solely when pressure is applied, promptly reverting to their default state upon release. Their design caters to applications necessitating momentary engagement, such as doorbells and computer keyboards, where sustained contact is unnecessary. Compact and durable, they endure frequent use while offering tactile feedback for user assurance. Beyond domestic utilities, they permeate industrial machinery, gaming interfaces, and medical instruments, embodying versatility and reliability. With their distinctive function and widespread utility, momentary push-buttons stand as quintessential components in the realm of electronics, seamlessly enabling temporary interactions in myriad settings.
Latching Buttons:
ULatching buttons are a bit different from momentary buttons. When you press a latching button, it stays in that position until you press it again to turn it off. It's like flipping a light switch - once you flick it up to turn the light on, it stays up until you flick it back down to turn it off. These buttons are often used for things like power switches or choosing different modes on electronic devices. So, if you have a device that needs to stay on or stay in a particular setting until you decide otherwise, a latching button is what you'd use. It's a simple way to control whether something stays on or off without having to hold down a button continuously.
Tactile Buttons:
Tactile buttons are designed to give you a physical sensation or a click sound when you press them. This "feedback" is really helpful because it lets you know for sure that you've pressed the button properly and that it's doing what it's supposed to do. It's like when you press the keys on a keyboard and feel them click under your fingers - that's tactile feedback in action. This tactile feedback is especially important in situations where accuracy is really important. For example, if you're using a device with lots of buttons, like a remote control or a game controller, you want to be sure that you're pressing the right button each time. The click or sensation from the tactile button confirms this for you, making your actions more precise. These buttons are also commonly used in environments where you might not be able to see the buttons clearly, like in dim lighting or if you're wearing gloves.
Illuminated Buttons:
These buttons come equipped with tiny built-in lights or LEDs that light up when you press them, giving you a clear visual indication that they've been activated. This visual feedback is super handy, especially in places where the lighting might not be very bright or where it's important to quickly see which buttons are being pressed. Imagine you're in a dimly lit room, trying to operate a control panel on a machine. Without the illuminated buttons, it might be hard to see which buttons you're pressing, leading to mistakes or confusion. But with these light-up buttons, you can easily tell which ones are active because they shine brightly, even in low-light conditions. They're commonly used in places like control panels for machinery or equipment, where operators need to quickly and accurately interact with the controls, regardless of the lighting conditions.
Circuit for LED blinking Using Arduino:
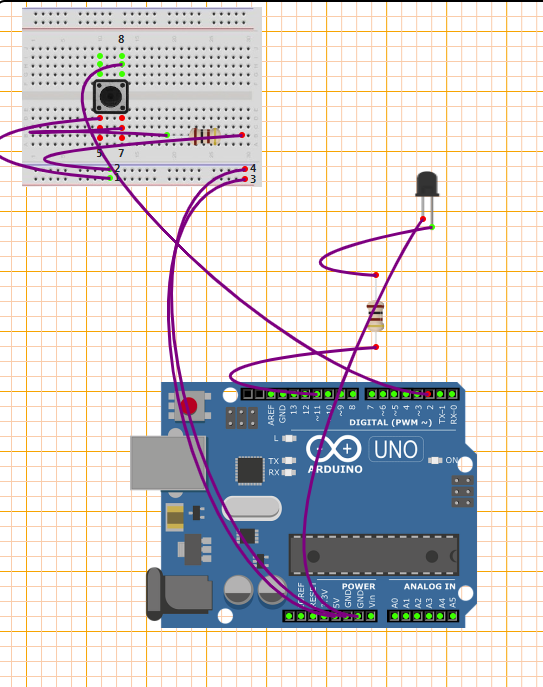
Working of the Circuit
1. Initialization:
• The code initializes the pin numbers for the button (buttonPin) and the LED (ledPin) as constants. It also declares variables to store the current state of the button (buttonState), the previous state of the button (lastButtonState), and the state of the LED (ledState).
• val = analogRead(potPin);
reads the analog value from the potentiometer connected to potPin. The analogRead() function returns a value between 0 and 1023 representing the voltage level at the pin.
2. In the setup(): function:
• The pinMode function configures ledPin as an output pin to control the LED, and buttonPin as an input pin to read the state of the push-button.
3. In the loop(): function:
• It reads the current state of the button using digitalRead(buttonPin) and stores it in buttonState.
• If there's a change in the button state compared to the last iteration, the code inside the if statement executes.
• Within the if statement:
If the current button state is HIGH (indicating the button is pressed), ledState is toggled using the ! operator (from LOW to HIGH or HIGH to LOW).
The new ledState is then written to the ledPin, which controls the LED, effectively turning it on or off.
A small delay of 50 milliseconds is added to debounce the button.
The current buttonState is stored in lastButtonState to be used in the next iteration.
Therefore, When the push-button is pressed, the buttonState changes from LOW to HIGH. This change triggers the LED to toggle its state. If it was off, it turns on, and vice versa. The LED remains in its current state until the button is released, as the code within the if statement only executes when there's a change in the button state. Releasing the button changes the buttonState back to LOW, but the LED's state remains unchanged until the button is pressed again.